Lynn Amber - Travel & Photography
sharing my thoughts through words and images
Photography Tales 3 – Amateur Photography Primer

“I think this is the most exciting time in the history of photography. Technology is expanding what photographers can do, like the microscope and the telescope expanded what scientists could do.” – Richard Misrach
I was looking for a quote that would help launch the first part of my discussion on this topic, which is all about the “technology” of the digital camera. I’ve often heard people say that it’s the photographer who crafts a good picture, regardless of the camera they are using. And, to some extent, I believe that is true. But, I also believe that understanding the technological capabilities of your camera and using them to your advantage can play a huge part in producing a great photo.
Being stationary for a winter, and having some spare time, is allowing me an opportunity to delve a bit deeper into my photography obsession. I’ve spent the last two years experimenting with my new Nikon D750 totally on my own – (while traveling and working from our Airstream travel trailer) – learning the settings through trial and error, and consulting the manual when necessary. And, let me tell you, the manual is very dog-eared at this point! I endearingly call this “experiential learning.” 😊

While I’m feeling quite comfortable with the camera now, I’m definitely at a crossroads where I’m craving more knowledge – in one direction, I’m seeking a return to the fundamentals and yet, in the other direction, I’m yearning for an advancement of my skills and techniques. This seems contradictory, right? Return to the basics, but also advance? Sometimes, however, I do believe the road to improvement is rooted in a return to the basics. Over the past two years with my Nikon, I’ve been predominantly using the Aperture-Priority mode as my default setting, and while I feel good about my abilities in this realm, I’ve reached a point where it’s apparent to me that I’m not really using my camera to its fullest potential, or my own creative abilities. I feel like I’m stuck in one of those bottomless, Vermont mud-season ruts and spinning my wheels – holding my own but not advancing.
The turning point for me was my decision to sign up for some online photography courses while I waited out cataract surgery this winter. I thought I had developed a pretty good working knowledge of my camera functionality until I signed up for these two classes – one focusing on just the settings for my specific camera, and the other, titled The Fundamentals of Photography. I was very quickly humbled to learn how much I didn’t know about my own camera’s capabilities. Furthermore, while I do have a reasonable grasp of basic photographic fundamentals, I recognized the need to ramp up my game and start setting new goals to advance my skills.
My goal with this series of blog posts is to outline my journey this winter toward improving my photography. This written dialogue is really more for me personally than anyone else. I wanted a place to chart my course, and record my progress. But, I hope whoever is reading takes something away from what I have to say! 😉 Getting back to basics is enlightening, inspiring and energizing.
This will be a series of posts – each one going a bit further than the last towards expanding upon photographic principles – from basic concepts to more advanced methods. I’m writing the content based on the classes I participated in, online blogs I’ve stumble upon, and my own trial-and-error experiences. I find I learn best by reviewing, condensing and reorganizing my notes in written format, and then, transferring these written notes to the field as practical exercises. It is an incredible experience to revert back to the basics and start fresh – I’ve already gained traction and feel myself lifting out of those darn ruts in the road!
I highly recommend taking the time to get help from the experts – whether it’s taking an online class, buying a hard-copy photography primer or surfing the internet for expert photography blogs that offer advice and tutorials. I am most definitely not one of those experts, but I’m hoping to close in on them! 😉
In an effort to stay focused and organized, here’s a basic outline of the topics I will touch upon over the next few blog posts – with a caveat that this is a dynamic outline, and subject change at any time! This is my journey – I hope you enjoy the ride.
An Amateur’s Photographic Journey
- There’s a setting for that! – get to know your camera inside and out
- Master the basic photography principles
- Ramp up your photo skills with some advanced techniques
- It’s all in the composition
- Photo processing options
- Practice! Practice! Practice!
- There’s a gadget for that
Here goes! I hope in my effort to record my learning process that I also inspire others to take the next step toward improving their own photography skills. Most important, of course, is to have fun with the process!
An Amateur’s Photographic Journey
Step 1. There’s a setting for that!
Up until I purchased my Nikon D750, I had been using Canon cameras all my life – from the old 35mm film models up to my last Canon – the EOS Rebel T3i. It was a real learning curve when I switched to Nikon. All the dials and settings are physically placed in different places on the camera body, and sometimes, the nomenclature is different as well. I still own and use my Rebel T3i, so it’s a real challenge when I opt to switch for a day and use the Canon after perhaps months of using my Nikon. It’s critical to develop an almost blind-folded ability to alter settings and make adjustments when out shooting pictures, especially if you are using different brands of cameras!
I found this to be particularly apparent when I attempted to get some shots of the moon rising over Mono Lake in the Eastern Sierras two summers ago. I was using my Nikon D750 with a 24mm-120mm lens. (I had owned the camera less than 6 months, and was still in the infancy stage of acclimating myself to the settings.) I positioned myself along the shore, in a spot that I thought was ideal, and was getting ready to adjust my camera settings. Amateur that I was (and still am), I realized too late that it probably would have been smart to bring my tripod, and also a headlamp. It was dark enough that I could not see the settings on my camera very well and only getting darker! The tripod was back at the campsite and the headlamp was in the truck, parked too far away to retrieve. These oversights forced me to use settings that would allow me to hand hold the camera with minimal blur-inducing movement. And thus, limit my options.
In addition, I wanted to try adjusting the white balance manually, as I had read that sometimes this is helpful for producing better results. Since I had not practiced doing this before (I’d always had the camera set to Auto White Balance), I was struggling to remember just how to manually alter this setting on the spot. I spent some valuable time figuring out how to do it (in the dark, without being able to see very well!), and that resulted in less time to take pictures of the moon as it was rising. James Joyce said it best — “Mistakes are the portals of discovery.” My results on that expedition:


The next four shots, I experimented with slight shutter speed adjustments, and altered the white balance on the last one for some subtle, but noticeable results. I should add that technically, I was using way to slow a shutter speed for hand-held photography, but like I said before – live and learn.


The moral of this story is – know the settings specific to your camera and how to quickly adjust them. The only real way to do this is to practice, practice and practice some more. The following is a list of the most critical settings to master, in a prioritized order from the most basic to the more advanced functionality. I’ll take each one and go a tad deeper, starting with The Absolute Basics First, which will wrap up this post.
i. The Absolute Basics First
ii. Mode dial
iii. Adjusting aperture/shutter speed
iv. Auto-focus options
v. Adjusting focal points and metering
vi. Using single shot vs. continuous shooting
vii. How to use the timer
viii. Flash usage
ix. Live view and advantages to using this
This is my humble opinion on how to approach this – others may disagree. With your camera manual in hand, start with “i” and work your way down the list – experimenting along the way. If you are a real newbie to photography, while learning each dial and button – put together a glossary of terms that you are unfamiliar with along with their definitions. Don’t worry about what they mean just yet – that will come later – after you are able to navigate around your camera!
i. The Absolute Basics First
a. Learn how and where to load batteries and memory cards – this is pretty essential wouldn’t you say? Probably goes without saying, but…..😊 I will offer some sound advice. Purchase two extra batteries for each camera – and always have the extras charged and ready to go. There’s nothing worse than having your camera battery die just at the moment you need it most. Countless customers came into the Jenny Lake store last summer wanting to know if we had an outlet where they could charge their camera battery! And, my final point on this, always have extra memory cards as well – and make it a habit to ALWAYS check your camera card slot before heading out on a trail, etc. to make sure you actually have one in there! Why do I include this sage piece of advice – it’s happened to yours truly more than once, and I hope it never happens again.
b. Decide on the file format – JPEG vs. RAW. Most non-professionals will use a JPEG file format since it is immediately available for use and widely recognized. RAW images are larger in file size, and require editing and conversion to JPEG for use. Think of a RAW image as the digital equivalent of a “negative.” RAW files capture more detail and dynamic range and are typically preferred by professionals who want more flexibility with post-photo processing. I recommend starting out with a format such as JPEG – fine or JPEG – high quality. You’ll need to determine how your camera brand labels this. Look for Image Quality settings in your manual for the options available to you and where to set these in your menu listings. Personally, I am starting to experiment more with RAW files now that I have access to Lightroom software. Part of my plan to “up my game”!
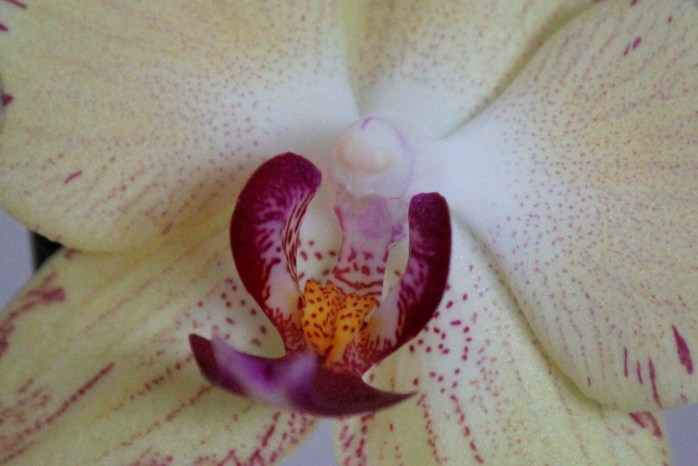
c. Choose the ISO setting – using some basic guidelines. It’s important to use the lowest ISO setting possible for conditions. ISO measures the sensitivity of your camera’s image sensor to light. A lower ISO number will produce a photo with finer grain and increased sharpness. Often, this is referred to as “noise” in a photo. If you look at a photo taken at ISO 100 compared to a photo captured at ISO 3200, you will see a “grainy” appearance on the later. That is “noise.” ISO 100 is often used as the benchmark that you should try to achieve for clear, sharp photos. However, depending on conditions, it is not always possible. The following photos show a close-up of one of my orchids – one with the ISO set to 100, and the bottom one with ISO 3200.

A good rule-of-thumb is to start with your camera at ISO 100, and then start making adjustments depending on what you are trying to achieve. For now, just learn where and how to set this. In a later discussion in Step 2, I’ll go into more depth on ISO.
I think that about wraps it up for this post. I’ll continue with Step 1 of my outline – examining the camera settings and feeling comfortable with them – in my future installment. Up next, the all important Mode Dial and more!
Ciao!

Nice pictures!!
LikeLike
Thanks!! 🙂 I appreciate that!
LikeLike